*NEW* Second Life Avatar Databank. Complete morph target UV mesh library and models in AC3D and OBJ formats with PNG format 1024x1024 texture templates.
Current version!
Notable enhancements in this release:
- Normalized export mode. Normalizes the prim on each axis, for smoother output. Many thanks to Darius Lehane!
- Batch export mode, accessible from TCL or TCP\IP scripts with function
tfpsculpties_save_batchmode <filename> <normalized yn>.
The scultpy prim exporter for AC3D is now official and available directly from Inivis!
Get it now: Download the Sculpted Prim Export Plug-in for AC3D
Many thanks to the fine folks at Inivis for their support.
Notable changes in this release:
- Support for Mac and Linux platforms as well as Windows
- No longer need to commit surfaces before exporting
- Minor fix to path naming convention on multi-part objects
- Improved undo support for sculpty functions
For more about AC3D, please visit their website at: http://www.inivis.com/
Sculpted Prim Exporter for AC3D
Quick Start Guide

Installing the AC3D Plug-in
To install the plug-in, copy the relevant sculpties.p into your AC3D 'plugins' folder (the plugin zip contains plug-ins for Windows, Linux and Mac OS X), then re-start AC3D.
Exporting a Model from AC3D
- Start with one of the sculpted prim base models included with your plug-in, or create your own model. Your model must be texture-mapped with a perfect uv space in order to export properly. Models built with subdivision surfaces work best.
- Edit your model as desired. For extruding, use the new Extrude function which this plugin adds to AC3D's Surface menu (see below for more info) . Subdivisions may be used, there is no need to commit subdivisions before export. (see below for an explanation of subdivision surfaces)
- From the AC3D File menu, choose Export, then 'Second Life Sculpted Prim'.
- Give your model a name, and click Save. If your file contains more than one mesh object, then each object will be saved as its own sculpt map.
Importing a Model into Second Life
- On Second Life's File menu, select Upload Image. Choose the sculpt map(s) you just exported and click Open.
- Right-click on the ground and choose Create to 'rez' a new prim on the ground in front of you.
- Click the More button in the Edit window to open the advanced options tab. Click on the Object tab.
- Under the Building Block Type, select Sculpted.
- Drag the image you just uploaded onto the Sculpt Texture in the edit window.
- Resize your prim as desired.
Video Tutorial
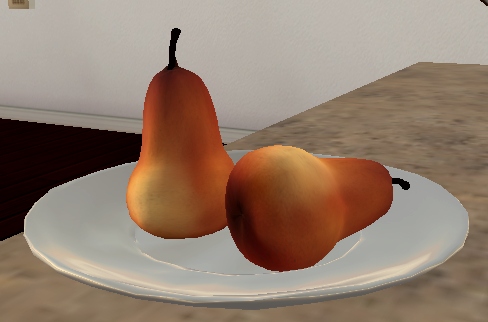
Learn to make these pears in only 5 minutes by watching this video tutorial!
Note: The AC3D model contains the stem, but the sculpt map didn't quite have enough resolution to hold it. Seemingly, the Lindens had the same problem with their apple model, and conveniently provided a stem as a separate object. :-) The pears shown use the Linden apple stem in addition to the shorter stem built into the base sculpt map. Instructions for building your own multi-part models for just this situation is outlined below.
Download the original model and textures:
- AC3D model
- Corel Photopaint Texture
- Exported Sculpt Map
- Exported Texture Map
Questions and Answers
What kind of models can I export?
Any model with a perfect uv space can be exported with the sculpty export plug-in.
What is a "perfect uv space" ?
Short answer:
A spherical map.
Long answer:
A perfect uv space is a set of texture coordinates that uses 100% of the available texture space, has no holes in the map, and wraps in all directions. This means the top matches the bottom and the left matches the right of the texture map. An ordinary spherical map is a common example of a perfect uv space.
According to documentation by Qarl Linden, future versions of sculpted prims will allow for non-spherical uv maps, but those aren't available just yet.
How do I get a perfect uv space?
Short answer
Use one of the pre-made shapes that are included with the plug-in as a basis for your own model.
Long answer:
You can texture your model using the texture tools built into AC3D. Just be sure to follow the rules and use all of the uv space and make sure it wraps in all directions. However, since this is a little tricky to do unless you are a seasoned texture artist, an easier way is to start with one of the pre-mapped primitive shapes that are included with the plug-in.
Three starter shapes are included:
- Sculpty Sphere
- Sculpty Cylinder
- Sculpty Cube
All three shapes are mapped correctly and have subdivisions set. The cube is gridded-out, so it's a perfect starter shape for using the box modelling technique.
Most of the tools in AC3D will preserve texture coordinates, so for the most part you can just modify these shapes and model as you normally would. The only notable exception is the Extrude tool, which keeps the mapping for the front face, but loses the sides. In this case, use the "Sculpty Extrude" tool on the Surfaces menu instead. This tool works exactly like Extrude by Normal, but it preserves the uv space when it extrudes the face. This tool works best when you extrude one face at a time.
Can I add faces to my model?
Short answer:
Yes!
Long answer:
Yes. You can use any tool you like as long as the uv space is preserved. You can use the Surfaces->Divide menu to add more faces if you need them. You can also use the knife tool to split faces along a line.
Again, if you want to extrude, be sure to use the Sculpty Extrude instead of the regular extrude so that the uv space is preserved. If for some reason you forget, just use AC3D's texture Coordinate Editor to re-map that part of the model to make it fit the map space.
How can I make my sculpty smoother?
Commit your subdivisions (AC3D menu Object->Commit-Subdivision), then subdivide more.
If that still doesn't make your model smooth enough, subdivide more. Three or four levels of subdivision seems to work best. i.e. Subdivide by three, then subdivide again by one. You can also slightly blur the exported map in your favorite paint program if you want it to be smoother still.
What are subdivision surfaces?
Short Answer:
A subdivision surface is a method of representing a smooth surface by using flat surfaces as a control mesh, much like control nodes can be used to alter the shape of a curve in a 2D drawing program.
Long Answer:
Subdivision modeling is a 3D modeling technique designed for creating smooth and organic shapes. It works by taking a flat surface, and then “sub dividing” it into additional surfaces, which are known as subdivision surfaces. The subdivision surfaces are then smoothed by the software to create a curved shape. For example, if you started with a cube and subdivided it, you would get a cube with rounded-off corners. If you kept going, the cube would get smoother and smoother until eventually you had an object that looked more like a sphere. Subdivision surfaces allow you to create smooth, flowing shapes that would be almost impossible to create by hand.
To subdivide in AC3D, simply select 'Subdiv +' from the toolbar.
Subdivision surfaces work particularly well for creating sculpties because they share a lot of similarities when they are rendered. When a sculpt map is scaled and sampled by the Second Life viewer, it creates smooth areas even when none existed originally. These smooth areas are influenced directly by the layout of the original map. Subdivision surfaces also create smooth areas in a very similar way. This means that an object created with subdivision surfaces will give a very accurate preview of how the final sculpty will look.
How do I make my sculpty have sharp corners?
Short answer:
Add more faces around the corners.
Long answer:
Due to the way sculpted prims are rendered in Second Life, there is a practical limit to how sharp the corners can be. According to the Second Life FAQ on Sculpted Prims:
"One issue here is the 8 bit precision on images, and the other issue is the jpeg compression applied to the data (all textures are converted into jpeg2000 format). The name "sculpted prim" was chosen to convey the idea of "approximate" shapes. ... "approximate" is pretty close to "exact". Furthermore, it wouldn't be hard to support 16bit images and higher precision/lossless compression in Second Life — but let's first see whether we need it.
With respect to sharp corners and angles, sculpted prims are quite similar to NURBS surfaces: A sculpted prim can have a more defined edge by dedicating more control points (vertices) to that area. At maximum resolution, a 32x32 pixel Sculpt Map would describe up to 1024 vertices (with each pixel representing a single vertex). The recommended sculpt map resolution is 64x64 pixels but in practice the highest level of detail for sculpted prims in Second Life is a grid of 32x32 vertices (larger images are downsampled), and the lower level of detail uses 16x16 vertices. If you need more vertices, split your model up into multiple prims. For reference, a torus-shaped prim in SL has about 1000 vertices."
So, to do this in AC3D, just add more faces around the corner you want to be sharper. If you have subdivisions set, this will give you a pretty good preview of what the corner will look like. In general, the more faces, the tighter the corner.
If you still need more detail, you can adjust the uv map to devote more texture space to the corner area. Just grab the faces in the Texture Coordinate Editor and stretch them so that they take up more of the map. This will give you more detail on these faces on the exported sculpty.
How detailed can my sculpty be?
Short Answer:
Between 256 and 1024 vertices at 8-bit precision, after smoothing.
Long Answer:
A sculpted prim at maximum resolution has 1024 vertices; at the next level-of-detail it will have 256 vertices. However, because sculpted prims always evenly distribute the vertices in a displaced sphere, a sculpted prim will (usually) not convey the same level of detail as a polygon model with 256 vertices, because the placement of those vertices cannot be as tightly controlled.
The other important factor in determining how detailed a sculpted prim can be is the 8-bit precision. A sculpted prim only uses 8-bits of numerical precision to describe the x, y, or z position of a vertex. A program like AC3D uses 32-bits of precision to describe the position of a vertex. This means that it's possible to model many details on a model in AC3D that will be too small to show up on the sculpted prim, because sculpted prims can't handle numbers that are that refined.
If you need that much detail, break your model up into multiple prims. The plug-in will export each mesh object in your AC3D file as its own sculpt map, so you can model them all together and then export the entire batch when you're ready to import them into Second Life.
How do I export a multi-part model?
Short Answer:
Give each mesh a unique name, then export as usual.
Long Answer:
You can have as many mesh objects as you need in your AC3D file. When you export the file to sculpted prim format, each mesh in the file will written to its own sculpt map. The files are named filename_meshname.tga, so be sure to give each mesh a unique name or they may be overwritten.
For example, if you created a model of a lamp, it might consist of several objects: the base, the shade, and a lightbulb. If you exported the file as "lamp", then the files the exporter will generate will be: lamp_base.tga, lamp_shade.tga and lamp_lightbulb.tga. When you import the files into Second Life, apply each texture to its own prim to re-construct the object.
Multi-part objects are a great way to work around sculpt map resolution limits. They can also make texturing much, much easier.
Why are the different parts of exported multi-part sculpties always 1m in size?
Short Answer:
To preserve precious surface detail. Resize the prims after you import the sculpt maps into Second Life.
Long Answer:
Sculpted prims are limited to 8 bits of precision on vertex position. This is only 25% of the precision in a normal model. Saving sculpt maps at scaled size would lose even more numerical precision--and thereby surface detail--and there's barely enough already.
To preseve detail, the exporter saves each individual sculpt map with the maximum possible range, which is 0 to 1 meter. To re-assemble your multi-part model in Second Life, read the size of the individual mesh object in AC3D, then apply the same size to the prim in Second Life.
Have fun!
The Inivis Team and TFPSoft
